Accounts
Accounts
Accounts are the core of Maxim Money. The Account window is made up of two main parts - the Transactions list, and the Transaction Details view. You can enter and modify transactions either directly in the Transactions register, or in the Details view. The Details view also allows you to add additional information such as Category and Memos. Additionally, when the Account window has focus, the Accounts context menu will appear:
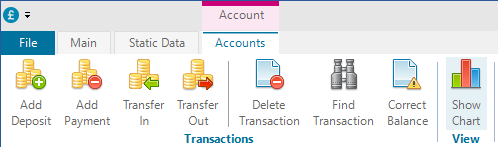
This gives handy buttons to add or delete transactions, bring up the Search window, Correct a balance, or toggle the chart.
Opening Balance
On the Details tab of Accounts, there is a field where you can specify an opening balance. This is useful if, for example, the transactions in your account start from a certain point in time, rather than when the account was opened.

Adding a value here will automatically enter a special transaction in your register, before any other transactions. This transaction will always stay pinned as the first transaction.

Setting this value back to 0 will remove the transaction.
Chart
Each Account window contains an associated Chart. This defaults to a balance history over the last 12 months for that account, but can be configured to be any chart. Although Maxim Money allows you full flexibility regarding layout, adding the chart as a toggle on the Accounts window ensures your favourite chart associated with the account is always kept with the transactions for that account.
Correct Balance
The Correct Balance feature is a really handy function that helps you work out where any discrepancies between your transaction register, and your bank statement. Simply click the Correct Balance button, and the following form will be displayed:
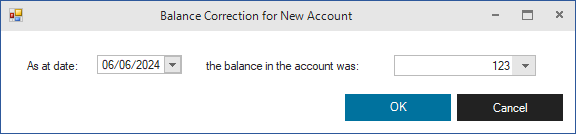
Enter the date of your known balance, and what the balance was on that date, and click OK. This will add a new special transaction into your register, like so:

This then shows you that the difference between the expected balance, and the balance you have currently is 23.00. This suggests that you either have a transaction for 23.00 missing in your register, or that one of your transactions is out by this much.
The Correcting Balance transaction works like a line in the sand. Any transactions changing above will not modify the balance on this special transaction, nor for any transactions below. Instead, it will modify the Payment or Deposit amounts to keep the balance at your desired figure. Once you correct the balance above the Correcting Balance transaction and the balance matches what you expect, the Correcting Balance transaction will automatically disappear.
You can also use this feature as a permanent entry, when you are just keeping track of values in an account, and don't necessarily have all the underlying transactions.
Transaction Details
The Transaction Details screen allows you to set details about the transaction.
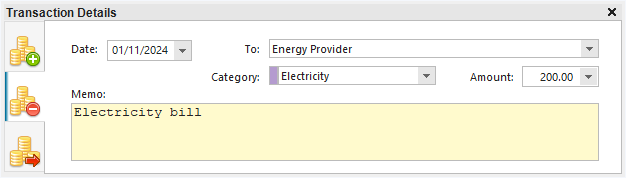
There are three tabs along the left hand side of the view. These allow you to quickly change the transaction from being a Deposit, Payment or Transfer. If you click on the Transfer tab a second time, it toggles between an inbound transfer, and an outbound one. This is highlighted by the arrow on the icon (green being inbound, red being outbound).
The Details tab can be minimised by clicking on the pin toggle. (NB. There isn't currently an option to restore the Details tab if you close it, although it will come back if you save and restore your data file).
You can select a Category for the transaction from the dropdown list. If you type a new value in here, it will automatically be added as a new category.
You can add any text here to remind you what the transaction was for.
Transfers
If you mark the transaction as being a transfer, the Payee list will change to an Accounts list. Once you select an account, an icon will appear in the register to show whether the transfer is inbound or outbound. Clicking on this icon will automatically select the associated transaction in the other account.
If the transfer is between accounts with different currencies, or if you click on the details button ( ), it will bring up the Transfer Details form:
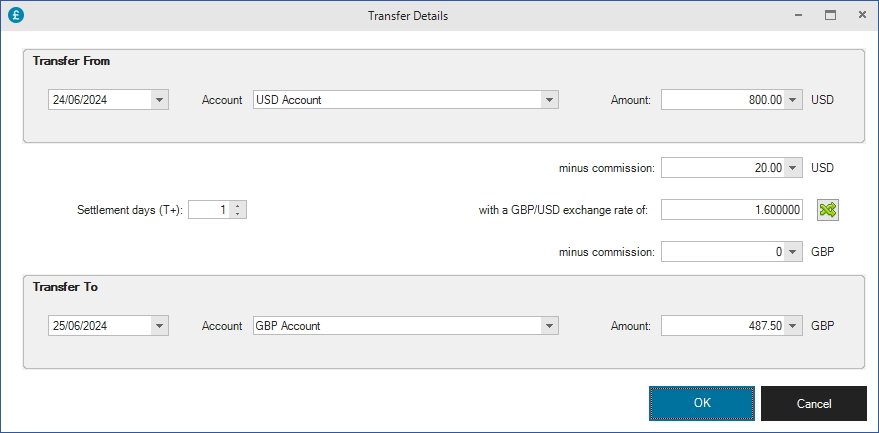
This allows you to specify an exchange rate between the two accounts, and any commission in either currency. Additionally, you can add in a settlement period between the accounts (i.e. a delay between money going out from one account and into the other).
Transaction Groups
Transaction Groups allow you to group several transactions together, but retain a single figure for the total of the transactions, which can be reconciled against your bank statement. This is useful where your bank statement may contain a single amount, but that amount is attributed to several things. For example, you may receive your monthly wages, but you want to record the breakdown of gross amount, tax, national insurance etc. Or you may pay a deposit into your bank, but the money was made up from different sources. Or you may pay a monthly amount to your energy supplier, but part of the amount is electricity and part is gas. Splitting the amount into multiple sub-transactions allows you to track the payee or category of each part individually.

Transaction Groups are similar to Split Transactions in Microsoft Money, in so far as you can split a transaction down into multiple categories. However, Groups in Maxim Money are more flexible. With Groups, you can select existing transactions and group them together into one single transaction. And you can add (via drag-and-drop) and remove transactions from the group. As a result, groups can contain multiple payees.
If all sub-transactions are for the same payee, the transaction register will display categories. If any transaction is for a different payee, the payee names will be displayed instead.
New buttons to Split, Group and Remove from group have been added to the main Accounts tab on the ribbon, and on the right-click menu.
Importing
You can import data directly into the Accounts register. Selecting an Imported transaction will activate the Reconciliation tab, where you can match the transaction off against any scheduled or manually entered transactions, or you can accept/reject the transaction.
Closing the Account
You can close the account by selecting it in the Accounts List, right-clicking and selecting Close Account from the menu. If you have the Hide Closed Accounts option checked on this menu, the account will disappear from view. If at any point you wish to re-open it, you can unhide closed accounts, and select Re-open Account. Closing Accounts simply removes them from your views and menus to keep things tidy.